- 官网给出的介绍
Flume is a distributed, reliable, and available service for efficiently collecting, aggregating, and moving large amounts of log data. It has a simple and flexible architecture based on streaming data flows. It is robust and fault tolerant with tunable reliability mechanisms and many failover and recovery mechanisms. It uses a simple extensible data model that allows for online analytic application.
点击查看flume官方配置文档
前言
flume作为一个数据采集工具,很明显的一个特点就是采集数据比较灵活,通常我们常把flume用来和kafka进行比较,但其实flume和flume和logstash比较是比较合适的。我们依然按照,是什么,怎么用。它的核心方面有哪些进行展开。
一、是什么
Flume是一种分布式,可靠且可用的服务,用于有效地收集,聚合和移动大量日志数据。它具有基于流数据流的简单灵活的体系结构。它具有可调整的可靠性机制以及许多故障转移和恢复机制,具有强大的功能和容错能力。它使用一个简单的可扩展数据模型,允许在线分析应用程序。事件作为Flume内部数据传输的最基本单元.它是由一个转载数据的字节数组(该数据组是从数据源接入点传入,并传输给传输器,也就是HDFS/HBase)和一个可选头部构成.
flume是一个数据采集工具,agent是flume的一个基本单元;flume的核心就是把数据从数据源(source)收集过来,再将收集到的数据送到指定的目的地(sink)。为了保证输送的过程一定成功,在送到目的地之前,会先缓存数据(channel),待数据真正的送到目的地(sink)后,flume再删除缓存中的数据(channel中的数据)。一行文本内容被反序列化成一个event。event的最大定义为2048字节,超过会被切割放到下一个event中。
Source用于采集数据,Source 是产生数据流的地方,同时 Source 会将产生的数据流传输到 Channel,这个有点类似于Java IO 部分的 Channel。
Channel 被设计为 Event 中转临时缓冲区,存储 Source 收集并且没有被Sink 读取的 Event,为平衡 Source 收集和 Sink 读取的速度,可视为 Flume内部的消息队列。
Sink从Channel 收集数据,将数据写到目标(可以是下一个 Source,也可以是 HDFS 或者 HBase)。
二、怎么用
用之前大概了解其是怎么被装上的再了解是如何使用的。
安装过程
第一步修改配置文件:在flume-env.sh加入如下内容(底层是Java)
export JAVA_HOME=/opt/jdk1.8
[root@wq1 conf]# pwd
/opt/flume-1.9.0/conf
[root@wq1 conf]# ll
-rw-r--r--. 1 2020 2020 3254 9月   8 11:06 flume-env.sh
-rw-rw-r--. 1 2020 2020 3107 12月 10 2018 log4j.properties
drwxr-xr-x. 2 root     root       78 11月  2 00:30 my_conf
第二步添加环境变量(目的是使得Linux系统能认识该flume组件)
echo 'export FLUME_HOME=/opt/flume-1.9.0' >> /etc/profile
echo 'export PATH=.:FLUME_HOME/bin:PATH' >> /etc/profile
source /etc/profile
怎么使用
- 了解flume安装目录
使用前你需要关注下面这几个目录
bin目录下负责执行flume的脚本
conf文件夹下又flume的配置文件,自定义的脚本
lib下放的是一些jar包,看到这些jar包你也就清楚了flume的底层仍是Java,后面自定义的拦截器打好jar包后放在这个下面。
[root@wq1 flume-1.9.0]# ll
总用量 168
drwxr-xr-x.  2 2020 2020    62 3月  24 16:10 bin
drwxr-xr-x.  3 2020 2020   134 3月  24 16:20 conf
drwxr-xr-x.  2 root     root      8192 3月  24 21:21 lib
[root@wq1 bin]# ll
总用量 36
-rwxr-xr-x. 1 2020 2020 12387 11月 16 2017 flume-ng
-rw-r--r--. 1 2020 2020   936 11月 16 2017 flume-ng.cmd
-rwxr-xr-x. 1 2020 2020 14176 11月 16 2017 flume-ng.ps1
[root@wq1 conf]# ll
总用量 16
-rw-r--r--. 1 2020 2020 1661 11月 16 2017 flume-conf.properties.template
-rw-r--r--. 1 2020 2020 1455 11月 16 2017 flume-env.ps1.template
-rw-r--r--. 1 2020 2020 1551 3月  24 16:16 flume-env.sh
-rw-rw-r--. 1 2020 2020 3127 3月  25 15:23 log4j.properties
drwxr-xr-x. 2 root     root       29 3月  25 14:39 selfconf
[root@wq1 lib]# ll
总用量 61984
-rw-r--r--. 1 2020 wuqi2020  346729 9月  12 2018 apache-log4j-extras-1.1.jar
-rw-rw-r--. 1 2020 2020   18031 9月  12 2018 async-1.4.0.jar
-rw-rw-r--. 1 2020 2020 1300395 9月  12 2018 asynchbase-1.7.0.jar
-rw-rw-r--. 1 2020 2020  303139 9月  13 2018 avro-1.7.4.jar
...
- 执行命令
#在这个bin目录下执行
[root@wq1 bin]# pwd
/opt/flume-1.9.0/bin
# 使用长参数
 flume-ng agent
 --conf conf # 指定flume安装目录下的conf目录
 --conf-file example.conf # 用户编写的agent的配置脚本
 --name a1 # 指定启动的agent的名称
 -Dflume.root.logger=INFO,console #日志打到控制台
# 使用简写的短参数
flume-ng agent \
-c /opt/flume-1.9.0/conf \
-f /opt/flume-1.9.0/conf/my_conf/natcat_logger.conf \
-n a1 \
-Dflume.root.logger=INFO,console
被执行的脚本
- flume采集单个文件的数据到kafka集群上
# a1是我们自定义的agent的名字
# a1.sources  a1这个agent包含的多个source的名字
# 包含几个组件就写一个名字空格隔开
a1.sources = r1
a1.sinks = k1
a1.channels = c1
# 配置source
a1.sources.r1.type = exec
#要采集的文件
a1.sources.r1.command = tail -F /root/cdhdata/products/dt=26/products-.1603703609450
# Describe the sink
# 配置sink
a1.sinks.k1.channel = c1
a1.sinks.k1.type = org.apache.flume.sink.kafka.KafkaSink
a1.sinks.k1.kafka.topic = products
a1.sinks.k1.kafka.bootstrap.servers = wq1:9092,wq2:9092,wq3:9092
# 每个批次刷新到HDFS上的events数量;
a1.sinks.k1.kafka.flumeBatchSize = 100
a1.sinks.k1.kafka.producer.acks = 1
a1.sinks.k1.kafka.producer.linger.ms = 1
a1.sinks.k1.kafka.producer.compression.type = snappy
# Use a channel which buffers events in memory
# 配置channel
a1.channels.c1.type = memory
a1.channels.c1.capacity = 1000
#事务容量,它就是putList和takeList的容量大小
a1.channels.c1.transactionCapacity = 100
# 将组件连接起来
a1.sources.r1.channels = c1
a1.sinks.k1.channel = c1
- flume采集kafka集群的数据到kafka集群上
a1.sources=r1
a1.sinks=k1
a1.channels=c1

# configure source
# source 为kafka类型
a1.sources.r1.type = org.apache.flume.source.kafka.KafkaSource
//批量大小-一次
a1.sources.r1.batchSize = 5000
//批处理时间-每隔多少毫秒处理的时间
a1.sources.r1.batchDurationMillis = 2000
a1.sources.r1.kafka.bootstrap.servers = cdh0203:9092,cdh0204:9092,cdh0205:9092
/topic
a1.sources.r1.kafka.topics = topic01-categories
#1earliest 当各分区下有已提交的offset时,从提交的offset开始消费;无提交的offset时,从头开始消费
#latest 当各分区下有已提交的offset时,从提交的offset开始消费;无提交的offset时,消费新产生的该分区下的数据
a1.sources.r1.kafka.consumer.auto.offset.reset = earliest
//组id,名字随意,同组可消费一个topic
a1.sources.r1.kafka.consumer.group.id = ds001
# configure sink
a1.sinks.k1.type = org.apache.flume.sink.kafka.KafkaSink
//自己集群的topic,但尽量与数据源topic一致
a1.sinks.k1.kafka.topic = topic01-categories
a1.sinks.k1.kafka.bootstrap.servers = cdh0053:9092,cdh0054:9092
#一次处理消息的数量
a1.sinks.k1.kafka.flumeBatchSize = 2000
#设置为1则leader接收到数据后就开始传输
a1.sinks.k1.kafka.producer.acks = 1
#每隔1秒接收一次数据
a1.sinks.k1.kafka.producer.linger.ms = 1
#不支持压缩
a1.sinks.k1.kafka.producer.compression.type = snappy
#批处理大小
a1.sinks.kafka-sink.kafka.producer.batch.size = 1048576
# configure channels
#基于内存传输数据
a1.channels.c1.type = memory
a1.channels.c1.capacity = 10000
a1.channels.c1.byteCapacityBufferPercentage = 20
a1.channels.c1.transactionCapacity = 10000
a1.channels.c1.byteCapacity = 800000
a1.sources.r1.channels = c1
a1.sinks.k1.channel = c1
我们已经知道了flume在采集数据的基本单位是event,它又可分三个部分,souce端用来采集数据,channeld的作用类似一个管道连接输入端与输出端,sink端负责将采集到的数据打到指定地方。那么事情就变的简单了,如果你的数据来源是kafka,那么你首先要找到kafka-source,如果你采集来的数据要打到hdfs上,那么你就在flume的官网上找hdfs-sink的配置即可,最后按照自己的具体细节要求对配置文件进行修改,那么你的执行脚本就写好了。
自定义flume拦截器
拦截器是简单的插件式组件,设置在source和channel之间。source接收到的时间,在写入channel之前,拦截器都可以进行转换或者删除这些事件。每个拦截器只处理同一个source接收到的事件。可以自定义拦截器。
在ideal上开始编写拦截器的代码
需求说明:对于下面这种文件我们只要状态码是404的文件,我们按照空格进行拆分数到第9个就是状态码
1.1.1.1 - - [26/Oct/2020:11:57:02 +0800] "GET / HTTP/2.0" 404 9631 "-" "Mozilla/5.0 (Windows NT 6.1; WOW64) AppleWebKit/537.36 (KHTML, like Gecko) Chrome/78.0.3904.108 Safari/537.36" "-"
第一步:引入依赖
 <!-- 根据Linux上flume的版本来 -->
<dependency>
      <groupId>org.apache.flume</groupId>
      <artifactId>flume-ng-core</artifactId>
      <version>1.9.0</version>
</dependency>
第二步:实现Interceptor,写内部类
package com.flume.interceptor;

import org.apache.flume.Context;
import org.apache.flume.Event;
import org.apache.flume.interceptor.Interceptor;
import org.slf4j.Logger;
import org.slf4j.LoggerFactory;


import java.util.ArrayList;
import java.util.List;

/**
 * @Author:wuqi
 * @DATE: 2021/3/24 0024
 * @TIME: 18:36
 * @PROJECT_NAME: flumelanjie
 */
public class Mylanjieqi implements Interceptor {

    //打印日志,便于测试方法的执行顺序
    private static final Logger logger = LoggerFactory.getLogger(Mylanjieqi.class);
    @Override
    public void initialize() {
        logger.info("----------自定义拦截器初始化---------------------");
    }
    //读取数据,定义拦截规则
    @Override
    public Event intercept(Event event) {
        logger.info("----------自定义拦截规则---------------------");
        byte[] body = event.getBody();
        String str = new String(body);
        String[] split = str.split("\\s+");
        logger.info("----------旧envent---------------------"+event.hashCode());
        if (split[8].equals("404")){
            event.setBody(str.getBytes());
            logger.info("----------新的envent---------------------"+event.hashCode());
            return event;
        }
        return null;
    }
    // 接收被过滤事件集合
    @Override
    public List<Event> intercept(List<Event> list) {
        logger.info("----------接收被过滤事件集合---------------------");
        List<Event> result = new ArrayList<Event>();
        Event event;
        for (Event e:list){
           event = intercept(e);
            if (event!=null){
                result.add(event);
            }
        }
        return result;
    }
    @Override
    public void close() {
        logger.info("----------拦截器关闭---------------------");
    }
   public static class Builder implements Interceptor.Builder {
        // 获取配置文件的属性
        @Override
        public Interceptor build() {
            logger.info("----------build()执行---------------------");
            return new Mylanjieqi();
        }
        @Override
        public void configure(Context context) {
            logger.info("----------configure(Context context)执行---------------------");
        }
    }
}
第三步:ideal打jar包
新建maven项目–》pom.xml改这个packaging为jar–》LifeCycle.clean.install
<groupId>org.example</groupId>
  <artifactId>laner</artifactId>
  <version>1.0-SNAPSHOT</version>
  <packaging>jar</packaging>
第四步:flume的配置
flume-hdfs.conf
# Name the components on this agent
# a1是我们自定义的agent的名字
# a1.sources  a1这个agent包含的多个source的名字
# 包含几个组件就写一个名字空格隔开
a1.sources = r1
a1.sinks = k1
a1.channels = c1
# Describe/configure the source
# 配置source
a1.sources.r1.type = exec
#采集的数据
a1.sources.r1.command = tail -F /root/w.text
# Describe the sink
# 配置sink
a1.sinks.k1.type = hdfs
a1.sinks.k1.hdfs.path = hdfs://192.168.236.236:9000/laner
a1.sinks.k1.hdfs.filePrefix = laner
#拦截器名称,架包的名
a1.sources.r1.interceptors = laner
#拦截器对象创建                           类路径.类名内部类名
a1.sources.r1.interceptors.laner.type = com.flume.interceptor.MylanjieqiBuilder
#hdfs sink间隔多长将临时文件滚动成最终目标文件,单位:秒;
a1.sinks.k1.hdfs.rollInterval = 0
#每多少M生成一个文件,是0的话就与无关
a1.sinks.k1.hdfs.rollSize = 0
# 当events数据达到该数量时候,将临时文件滚动成目标文件;
a1.sinks.k1.hdfs.rollCount = 0
# 文件的格式。包含:Text, Writable(默认)
a1.sinks.k1.hdfs.writeFormat = text
#写sequence文件的格式。包含:Text, Writable(默认)
a1.sinks.k1.hdfs.fileType = DataStream
#包括:SequenceFile, DataStream,CompressedStream 使用DataStream时候,文件不会被压缩
# Use a channel which buffers events in memory
# 配置channel
a1.channels.c1.type = memory
a1.channels.c1.capacity = 100000
a1.channels.c1.transactionCapacity = 10000
# 将组件连接起来
a1.sources.r1.channels = c1
a1.sinks.k1.channel = c1
打好的架包放到flume的lib下就行
本篇文章末也有flume的配置实例
flume采集多个文件夹下的数据并在hdfs产生不同的文件夹
现在机器上有六个文件夹,现在要将这些文件采集到hdfs上,也就是hdfs上会有六个文件夹,每个文件夹下若干个块
- 数据源如下
[root@wq1 ~]# du -h -d1 shoppingmallonline/
4.0K    shoppingmallonline/categories
146M    shoppingmallonline/custom
1.4G    shoppingmallonline/employee
1.2G    shoppingmallonline/order
398M    shoppingmallonline/orderdetail
416K    shoppingmallonline/products
- flume脚本文件
因为我想通过一个脚本把六个文件夹下的文件通过flume传到hdfs的六个不同文件夹下,所以这么写,分别写六个脚本运行六次也可以达到目的;
# Name the components on this agent
#六个source
a2.sources = r1 r2 r3 r4 r5 r6
a2.sinks = k1
a2.channels = c1

# Describe/configure the source
a2.sources.r1.type=TAILDIR
#如果该文件位置内容没有发生变化,则flume在断开后可以从上次断开处继续采集
a2.sources.r1.positionFile = /root/opt/flume-1.9.0/data/taildir1_position.json
#文件的组,可以定义多种,此时是一个source下一个组处理一种类型的文件,定义多个组的话就可以分别处理多种文件
a2.sources.r1.filegroups = f1
#该组处理的是文件开头都为categories-.的文件
a2.sources.r1.filegroups.f1 = /root/shoppingmallonline/categories/dt=26/categories-.*
#拦截器的名,与下面这个名保持一致就行
a2.sources.r1.interceptors = i1
#表示目前使用的是,静态拦截器(属于flume内置拦截器的一种):将k/v插入到事件的报头中,此处我用来实现hdfs不同文件夹名的目的
a2.sources.r1.interceptors.i1.type = static
a2.sources.r1.interceptors.i1.key = type
a2.sources.r1.interceptors.i1.value = categories

a2.sources.r1.type=TAILDIR
a2.sources.r2.filegroups = f1
a2.sources.r2.filegroups.f1 = /root/shoppingmallonline/custom/dt=26/customers-.*
a2.sources.r2.interceptors = i2
a2.sources.r2.interceptors.i2.type = static
a2.sources.r2.interceptors.i2.key = type
a2.sources.r2.interceptors.i2.value = custom

a2.sources.r1.type=TAILDIR
a2.sources.r3.filegroups = f1
a2.sources.r3.filegroups.f1 = /root/shoppingmallonline/employee/dt=26/employees-.*
a2.sources.r3.interceptors = i3
a2.sources.r3.interceptors.i3.type = static
a2.sources.r3.interceptors.i3.key = type
a2.sources.r3.interceptors.i3.value = employee

a2.sources.r1.type=TAILDIR
a2.sources.r4.filegroups = f1
a2.sources.r4.filegroups.f1 = /root/shoppingmallonline/order/dt=26/orders-.*
a2.sources.r4.interceptors = i4
a2.sources.r4.interceptors.i4.type = static
a2.sources.r4.interceptors.i4.key = type
a2.sources.r4.interceptors.i4.value = order

a2.sources.r1.type=TAILDIR
a2.sources.r5.filegroups = f1
a2.sources.r5.filegroups.f1 = /root/shoppingmallonline/orderdetail/dt=26/orderdetails-.*
a2.sources.r5.interceptors = i5
a2.sources.r5.interceptors.i5.type = static
a2.sources.r5.interceptors.i5.key = type
a2.sources.r5.interceptors.i5.value = orderdetail

a2.sources.r1.type=TAILDIR
a2.sources.r6.filegroups = f1
a2.sources.r6.filegroups.f1 = /root/shoppingmallonline/products/dt=26/products-.*
a2.sources.r6.interceptors = i6
a2.sources.r6.interceptors.i6.type = static
a2.sources.r6.interceptors.i6.key = type
a2.sources.r6.interceptors.i6.value = products


#具体定义sink
a2.sinks.k1.type = hdfs
a2.sinks.k1.hdfs.path = hdfs://192.168.236.236:9000/source-six/%{type}
#指定文件前缀
a2.sinks.k1.hdfs.filePrefix = %{type}-
#不压缩
a2.sinks.k1.hdfs.fileType = DataStream
#如果压缩指定压缩的方式
#如果压缩存储的话HDFS上的文件达到128M时生成一个文件
#注意是压缩前大小为128生成一个文件,然后压缩存储。
#a2.sinks.k1.hdfs.fileType = CompressedStream
#a2.sinks.k1.hdfs.codeC = gzip
#不按照条数生成文件
a2.sinks.k1.hdfs.rollCount = 0
a2.sinks.k1.hdfs.rollSize = 134217728
a2.sinks.k1.hdfs.rollInterval = 0


# Use a channel which buffers events in memory
a2.channels.c1.type = memory
a2.channels.c1.capacity = 1000
a2.channels.c1.transactionCapacity = 100

# Bind the source and sink to the channel
a2.sources.r1.channels = c1
a2.sources.r2.channels = c1
a2.sources.r3.channels = c1
a2.sources.r4.channels = c1
a2.sources.r5.channels = c1
a2.sources.r6.channels = c1
a2.sinks.k1.channel = c1
- 执行
flume-ng agent \
--conf /opt/flume-1.9.0/conf \
--conf-file /opt/flume-1.9.0/conf/selfconf/flume1-hdfs.conf \
--name a2 \
-Dflume.monitoring.type=http \
-Dflume.monitoring.port=5653 \
-Dflume.root.logger=INFO,console
- 过程观察
WebUi上的json文件
{"SINK.k1":{"ConnectionCreatedCount":"27",
            "BatchCompleteCount":"346812",
            "EventWriteFail":"0",
            "BatchEmptyCount":"250",
            "EventDrainAttemptCount":"34681272",
            "StartTime":"1616938071561",
            "BatchUnderflowCount":"1",
            "ChannelReadFail":"0",
            "ConnectionFailedCount":"0",
            "ConnectionClosedCount":"22",
            "Type":"SINK",
            "EventDrainSuccessCount":"34681272",
            "StopTime":"0"},
 "SOURCE.r3":{"AppendBatchAcceptedCount":"86932",
              "GenericProcessingFail":"0",
              "EventAcceptedCount":"8692898",
              "AppendReceivedCount":"0",
              "StartTime":"1616938071941",
              "AppendBatchReceivedCount":"86932",
              "ChannelWriteFail":"0",
              "EventReceivedCount":"8692898",
              "EventReadFail":"0",
              "Type":"SOURCE",
              "AppendAcceptedCount":"0",
              "OpenConnectionCount":"0",
              "StopTime":"0"},
 "SOURCE.r4":{"AppendBatchAcceptedCount":"99923",
              "GenericProcessingFail":"0",
              "EventAcceptedCount":"9992082",
              "AppendReceivedCount":"0",
              "StartTime":"1616938071858",
              "AppendBatchReceivedCount":"99925",
              "ChannelWriteFail":"2","EventReceivedCount":"9992282",
              "EventReadFail":"0","Type":"SOURCE",
              "AppendAcceptedCount":"0",
              "OpenConnectionCount":"0",
              "StopTime":"0"},
 "SOURCE.r5":{"AppendBatchAcceptedCount":"149937",
              "GenericProcessingFail":"0",
              "EventAcceptedCount":"14993597",
              "AppendReceivedCount":"0",
              "StartTime":"1616938071698",
              "AppendBatchReceivedCount":"149938",
              "ChannelWriteFail":"1",
              "EventReceivedCount":"14993697",
              "EventReadFail":"0","Type":"SOURCE",
              "AppendAcceptedCount":"0",
              "OpenConnectionCount":"0",
              "StopTime":"0"},
 "CHANNEL.c1":{"ChannelCapacity":"1000",
               "ChannelFillPercentage":"0.0",
               "Type":"CHANNEL",
               "ChannelSize":"0",
               "EventTakeSuccessCount":"34681272",
               "EventTakeAttemptCount":"34681523",
               "StartTime":"1616938071553",
               "EventPutAttemptCount":"34681672",
               "EventPutSuccessCount":"34681272",
               "StopTime":"0"},
 "SOURCE.r6":{"AppendBatchAcceptedCount":"100",
              "GenericProcessingFail":"0",
              "EventAcceptedCount":"10000",
              "AppendReceivedCount":"0",
              "StartTime":"1616938071711",
              "AppendBatchReceivedCount":"100",
              "ChannelWriteFail":"0",
              "EventReceivedCount":"10000",
              "EventReadFail":"0","Type":"SOURCE",
              "AppendAcceptedCount":"0",
              "OpenConnectionCount":"0",
              "StopTime":"0"},
 "SOURCE.r1":{"AppendBatchAcceptedCount":"0",
              "GenericProcessingFail":"0",
              "EventAcceptedCount":"0",
              "AppendReceivedCount":"0","StartTime":"1616938071859",
              "AppendBatchReceivedCount":"0",
              "ChannelWriteFail":"0",
              "EventReceivedCount":"0",
              "EventReadFail":"0",
              "Type":"SOURCE","AppendAcceptedCount":"0",
              "OpenConnectionCount":"0",
              "StopTime":"0"},
 "SOURCE.r2":{"AppendBatchAcceptedCount":"9927",
              "GenericProcessingFail":"0",
              "EventAcceptedCount":"992695",
              "AppendReceivedCount":"0",
              "StartTime":"1616938071718",
              "AppendBatchReceivedCount":"9928",
              "ChannelWriteFail":"1",
              "EventReceivedCount":"992795",
              "EventReadFail":"0",
              "Type":"SOURCE",
              "AppendAcceptedCount":"0",
              "OpenConnectionCount":"0",
              "StopTime":"0"}}
上面的个属性的含义对照
{
    "SOURCE.src-1":{
        "OpenConnectionCount":"0",      //目前与客户端或sink保持连接的总数量(目前只有avro source展现该度量)
        "Type":"SOURCE",
        "AppendBatchAcceptedCount":"1355",  //成功提交到channel的批次的总数量
        "AppendBatchReceivedCount":"1355",  //接收到事件批次的总数量
        "EventAcceptedCount":"28286",   //成功写出到channel的事件总数量,且source返回success给创建事件的sink或RPC客户端系统
        "AppendReceivedCount":"0",      //每批只有一个事件的事件总数量(与RPC调用中的一个append调用相等)
        "StopTime":"0",         //source停止时自Epoch以来的毫秒值时间
        "StartTime":"1442566410435",    //source启动时自Epoch以来的毫秒值时间
        "EventReceivedCount":"28286",   //目前为止source已经接收到的事件总数量
        "AppendAcceptedCount":"0"       //单独传入的事件到Channel且成功返回的事件总数量
    },
    "CHANNEL.ch-1":{
        "EventPutSuccessCount":"28286", //成功写入channel且提交的事件总数量
        "ChannelFillPercentage":"0.0",  //channel满时的百分比
        "Type":"CHANNEL",
        "StopTime":"0",         //channel停止时自Epoch以来的毫秒值时间
        "EventPutAttemptCount":"28286", //Source尝试写入Channe的事件总数量
        "ChannelSize":"0",          //目前channel中事件的总数量
        "StartTime":"1442566410326",    //channel启动时自Epoch以来的毫秒值时间
        "EventTakeSuccessCount":"28286",    //sink成功读取的事件的总数量
        "ChannelCapacity":"1000000",       //channel的容量
        "EventTakeAttemptCount":"313734329512" //sink尝试从channel拉取事件的总数量。这不意味着每次事件都被返回,因为sink拉取的时候channel可能没有任何数据
    },
    "SINK.sink-1":{
        "Type":"SINK",
        "ConnectionClosedCount":"0",    //下一阶段或存储系统关闭的连接数量(如在HDFS中关闭一个文件)
        "EventDrainSuccessCount":"28286",   //sink成功写出到存储的事件总数量
        "KafkaEventSendTimer":"482493",
        "BatchCompleteCount":"0",       //与最大批量尺寸相等的批量的数量
        "ConnectionFailedCount":"0",    //下一阶段或存储系统由于错误关闭的连接数量(如HDFS上一个新创建的文件因为超时而关闭)
        "EventDrainAttemptCount":"0",   //sink尝试写出到存储的事件总数量
        "ConnectionCreatedCount":"0",   //下一个阶段或存储系统创建的连接数量(如HDFS创建一个新文件)
        "BatchEmptyCount":"0",      //空的批量的数量,如果数量很大表示souce写数据比sink清理数据慢速度慢很多
        "StopTime":"0",
        "RollbackCount":"9",            //
        "StartTime":"1442566411897",
        "BatchUnderflowCount":"0"       //比sink配置使用的最大批量尺寸更小的批量的数量,如果该值很高也表示sink比souce更快
    }
    }
控制台上展示的
- 通过上述过程建立了一个基本概念
查看我服务器的配置
[root@wq1 ~]# cat /proc/cpuinfo | grep name | cut -f2 -d: | uniq -c
4  Intel(R) Core(TM) i5-4210H CPU @ 2.90GHz
[root@wq1 ~]# free -h
              total        used        free      shared  buff/cache   available
Mem:           1.8G        1.2G        147M        6.2M        451M        433M
Swap:          2.0G         12M        2.0G
此次传输数据使用的是单节点的flume传递3.1G的数据,用时1个小时
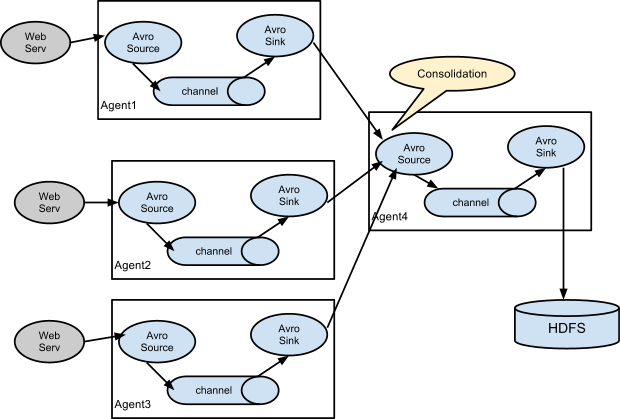
三、需要重点关注的地方
- 官网给出的图
有三种形式:一个agent的sink到另一个agent的source、一个source配有多个channel多个sink然后把数据打到不同的地方、还有一种就是下图这种;
在向kafka传数据时需要了解到的情形
Kafka Sink: Flume 通过 Kafka Sink 将 Event 写⼊到 Kafka 中的主题,其他应⽤通过订阅主题消费数据。
kafka.producer.acks 可以设置 Producer 端发送消息到 Broker 之后不需要等待 Broker 返回成功送达的信号。

0表示Producer 发送消息到 Broker 之后不需要等待 Broker 返回成功送达的信号,这种⽅式吞吐量⾼,但存在丢失数据的风险。

1表示 Broker 接收到消息成功写⼊本地 log ⽂件后向 Producer 返回成功 接收的信号,不需要等待所有的 Follower 全部同步完消息后再做回应,这种⽅式在数据丢失风险和吞吐量之间做了平衡

-1表示 Broker 接收到 Producer 的消息成功写⼊本地log 并且等待所有的 Follower 成功写⼊本地 log 后向 Producer 返回成功接收的信号,这种⽅式能够保证消息不丢失,但是性能最差(层层递进)
Flume 的负载均衡和故障转移
采集Avro
– 多路复用选择器
机器wq1上的flume发送给wq2和wq3上同样的数据,如何你想采集同一数据源分别做不同的处理可以选择该选择器
机器wq1上的脚本dir_flume.conf
#dir_flume.conf
a1.sources = r1
a1.sinks = k1 k2
a1.channels = c1 c2
a1.sources.r1.selector.type = multiplexing
a1.sources.r1.selector.header= state
#                       mapping.的这个名随便起
a1.sources.r1.selector.mapping.CZ= c1
a1.sources.r1.selector.mapping.US= c2
a1.sources.r1.selector.default= c1 c2
# Describe/configure the source
a1.sources.r1.type = exec
a1.sources.r1.command = tail -F /root/w1.text

# Describe the sink
# sink 端的 avro 是一个数据发送者
a1.sinks.k1.type = avro
a1.sinks.k1.hostname = wq3
a1.sinks.k1.port = 4141

a1.sinks.k2.type = avro
a1.sinks.k2.hostname = wq2
a1.sinks.k2.port = 4142

# Describe the channel
a1.channels.c1.type = memory
a1.channels.c1.capacity = 1000
a1.channels.c1.transactionCapacity = 100

a1.channels.c2.type = memory
a1.channels.c2.capacity = 1000
a1.channels.c2.transactionCapacity = 100

# Bind the source and sink to the channel
a1.sources.r1.channels = c1 c2
a1.sinks.k1.channel = c1
a1.sinks.k2.channel = c2
机器wq2和wq3脚本差不多(就机器名和端口号不一样)flume_avro2.conf
[root@wq3 selfconf]# cat flume_avro2.conf

######flume_avro2.conf
# Name the components on this agent
a2.sources = r1
a2.sinks = k1
a2.channels = c2

# Describe/configure the source
a2.sources.r1.type = avro
a2.sources.r1.bind = wq3
a2.sources.r1.port = 4141

# Describe the sink
#本地文件格式
a2.sinks.k1.type = file_roll
#在该文件夹下存放传输过来的数据
a2.sinks.k1.sink.directory = /root/selector_flume_avro
#不按照时间进行,默认每三秒生成一个文件
a2.sinks.k1.sink.rollInterval = 0
# Describe the channel
a2.channels.c2.type = memory
a2.channels.c2.capacity = 1000
a2.channels.c2.transactionCapacity = 100

# Bind the source and sink to the channel
a2.sources.r1.channels = c2
a2.sinks.k1.channel = c2
- 轮询负载均衡
首先看实现效果
机器wq1上的flume采集数据集分别传输到wq2,wq3,传输过程是轮询的方式
[root@wq1 ~]# echo ‘1’ >> w1.text
[root@wq1 ~]# echo ‘2’ >> w1.text
[root@wq1 ~]# echo ‘3’ >> w1.text
[root@wq1 ~]# echo ‘4’ >> w1.text
[root@wq1 ~]# echo ‘5’ >> w1.text
[root@wq3 selector_flume_avro]# tail -f 1617453112325-1
‘1’
‘3’
‘5’
[root@wq2 selector_flume_avro]# tail -f 1617453116741-1
‘specialwu’
‘2’
‘4’
机器wq1的采集数据脚本lunxun.conf
# Name the components on this agent
a1.sources = r1
a1.sinks = k1 k2
a1.channels = c1

# Describe/configure the source
a1.sources.r1.type = exec
a1.sources.r1.channels=c1
a1.sources.r1.command=tail -F /root/w1.text

#define sinkgroups
a1.sinkgroups=g1
a1.sinkgroups.g1.sinks=k1 k2
a1.sinkgroups.g1.processor.type=load_balance
a1.sinkgroups.g1.processor.backoff=true
a1.sinkgroups.g1.processor.selector=round_robin

#define the sink 1
a1.sinks.k1.type=avro
a1.sinks.k1.hostname=wq3
a1.sinks.k1.port=4141

#define the sink 2
a1.sinks.k2.type=avro
a1.sinks.k2.hostname=wq2
a1.sinks.k2.port=4142


# Use a channel which buffers events in memory
a1.channels.c1.type = memory
a1.channels.c1.capacity = 1000
a1.channels.c1.transactionCapacity = 100

# Bind the source and sink to the channel
a1.sources.r1.channels = c1
a1.sinks.k1.channel = c1
a1.sinks.k2.channel=c1
执行
flume-ng agent \
--conf /opt/flume-1.9.0/conf \
--conf-file /opt/flume-1.9.0/conf/selfconf/lunxun.conf \
--name a1 \
-Dflume.root.logger=INFO,console
⽬的是为了提⾼整个系统的容错能⼒和稳定性。简单配置就可以轻松实现,⾸先需要设置 Sink 组,同⼀个 Sink 组内有多个⼦ Sink,不同 Sink 之间可以配置成负载均衡或者故障转移。
Flume和Kafka选取
- Flume和Kafka的区别与联系
flume追求的是数据和数据源、数据流向的多样性,适合多个生产者的场景;
kafka追求的是高吞吐,高负载,同一topic下可以有多个partition,由于是pull模式拉取数据,因此适合多个消费者的场景;kafka没有内置的producer和consumer组件,需要自己编写代码。Flume可以使用拦截器实时处理数据。这些对数据屏蔽或者过量是很有用的。Kafka需要外部的流处理系统才能做到。
- 如何选取
Kafka 是一个非常通用的系统。你可以有许多生产者和很多的消费者共享多个主题Topics。相比之下,Flume是一个专用工具被设计为旨在往HDFS,HBase发送数据。它对HDFS有特殊的优化,并且集成了Hadoop的安全特性。所以,Cloudera 建议如果数据被多个系统消费的话,使用kafka;如果数据被设计给Hadoop使用,使用Flume。Kafka和Flume都是可靠的系统,通过适当的配置能保证零数据丢失。然而,Flume不支持副本事件。于是,如果Flume代理的一个节点奔溃了,即使使用了可靠的文件管道方式,你也将丢失这些事件直到你恢复这些磁盘。如果你需要一个高可靠行的管道,那么使用Kafka是个更好的选择。在实际生产中通常是flume+kafka搭配使用,既能满足可以方便的导数据到hdfs上,也可做流式计算时直接从kafka上拿数据。
flume和kafka采集日志区别,采集日志时中间停了,怎么记录之前的日志。
Flume采集日志是通过流的方式直接将日志收集到存储层,而kafka是将缓存在kafka集群,待后期可以采集到存储层。
Flume采集中间停了,可以采用文件的方式记录之前的日志,而kafka是采用offset的方式记录之前的日志。
Flume的配置实例
清楚的了解各个实例有助于在使用过程中对参数做一个很好的选择。
如果Hadoop和flume不在同一节点需要复制Hadoop的jar包到flume
docker cp /opt/hadoop-2.7.7/share/hadoop/common/hadoop-common-2.7.7.jar flume01:/opt/flume-1.9.0/lib
docker cp /opt/hadoop-2.7.7/share/hadoop/common/lib/commons-configuration-1.6.jar flume01:/opt/flume-1.9.0/lib
docker cp /opt/hadoop-2.7.7/share/hadoop/common/lib/hadoop-auth-2.7.7.jar flume01:/opt/flume-1.9.0/lib
docker cp /opt/hadoop-2.7.7/share/hadoop/common/lib/htrace-core-3.1.0-incubating.jar flume01:/opt/flume-1.9.0/lib
docker cp /opt/hadoop-2.7.7/share/hadoop/hdfs/hadoop-hdfs-2.7.7.jar flume01:/opt/flume-1.9.0/lib
docker cp /opt/hadoop-2.7.7/share/hadoop/common/lib/commons-io-2.4.jar flume01:/opt/flume-1.9.0/lib
source
batchSize是针对Source和Sink提出的一个概念,它用来限制source和sink对event批量处理的。
即一次性你可以处理batchSize个event,这个一次性就是指在一个事务中。
当你处理的event数量超出了batchSize,那么事务就会提交了。
注意,这里有一个隐晦的地方,就是batchSize一定不能大于transactionCapacity
查看下面的配置前明确几个参数
#source相关
batch size:向channel发送数据的批次大小
maxBatchCount:从同一个文件中连续读取的最大批次数量
writepostInterval:向json文件追击内容的频率(taidir source下有,默认三秒)
#channel相关
capacity:时间容纳的数目
transcapacity:每个事物能够包含的事件数目(source一次的put或sink一次的take)
#在给参数大小时符合下面这要求
batch size<=transcapacity<=capacity
- Taildir Source(可用来读取文件夹下多个文件,可实现断点续传)
Taildir Source 可以读取多个文件最新追加写入的内容!
Taildir Source是可靠的,即使flume出现了故障或挂掉。Taildir Source在工作时,会将读取文件的最后的位置记录在一个json文件中,一旦agent重启,会从之前已经记录的位置,继续执行tail操作!
Json文件中,位置是可以修改,修改后,Taildir Source会从修改的位置进行tail操作!如果JSON文件丢失了,此时会重新从每个文件的第一行,重新读取,这会造成数据的重复!
Taildir Source目前只能读文本文件
监视指定的文件,一旦检测到附加到每个文件的新行,就几乎实时跟踪它们。如果正在写入新行,则此源将重新尝试读取它们,等待写入完成。
这个源是可靠的,即使在拖尾文件旋转时也不会丢失数据。它定期地以JSON格式在给定的位置文件上写入每个文件的最后读取位置。如果Flume由于某种原因被停止或关闭,它可以从写入现有位置文件的位置重新开始尾随。目前这个源不支持跟踪二进制文件。它逐行读取文本文件。
a1.sources.r1.type = TAILDIR
#记录了每条文件的inode,作用就是flume断开后,下次采集数据就会从新的位置开始
a1.sources.r1.positionFile = /var/log/flume/taildir_position.json
a1.sources.r1.filegroups = f1
#向上面的json文件写inode的频率
a1.sources.r1.writePosInterval = 1000
#表示只采集.txt的文件
a1.sources.r1.filegroups.f1 = /root/cdhdata/custom/.*txt
#Header value which is the set with header key. Multiple headers can be specified for one file group.
a1.sources.r1.headers.f1.headerKey1 = value1
#Whether to add a header storing the absolute path filename.
a1.sources.r1.fileHeader = true
#Header key to use when appending absolute path filename to event header.
a1.sources.r1.headers.f1.headerKey1 = value1
#从同一文件连续读取的批次数,如果有多个文件,且其中一个文件读取速度快,那么这个文件就会一直被读取,影响其他文件的专属
a1.sources.r1.maxBatchCount = 1000
cat /var/log/flume/taildir_position.json
[
{"inode":69131227,"pos":14402,"file":"/root/test/w.text"},
{"inode":69131221,"pos":14450,"file":"/root/test/w1.text"},
{"inode":69131185,"pos":14306,"file":"/root/test/w.log"}
]
inode(文件唯一标识号码)、pos(被采集文件的最后采集位置,也就是文件的byte字节数)
- kafka source
Kafka Source是一个Apache Kafka消费者,它读取来自Kafka主题的消息。如果有多个Kafka源在运行,可以将它们配置为相同的使用者组,这样每个使用者都将为主题读取一组惟一的分区。
a3.sources.r1.type = org.apache.flume.source.kafka.KafkaSource
#积攒5000个event到一个地方
a3.sources.r1.batchSize = 5000
a3.sources.r1.batchDurationMillis = 2000
#kafka集群
a3.sources.r1.kafka.bootstrap.servers = wq1:9092,wq2:9092,wq3:9092
a3.sources.r1.kafka.consumer.auto.offset.reset = earliest
#多个topic用,隔开
a3.sources.r1.kafka.topics = hdfs-hive
- Avro source
通常跨机器采集数据时使用
a1.sources = r1
a1.channels = c1
a1.sources.r1.type = avro
a1.sources.r1.channels = c1
a1.sources.r1.bind = 0.0.0.0
a1.sources.r1.port = 4141
ipFilter=true
ipFilterRules=allow:ip:127.*,allow:name:localhost,deny:ip:*
sink
- HDFS Sink
This sink writes events into the Hadoop Distributed File System (HDFS). It currently supports creating text and sequence files. It supports compression in both file types. The files can be rolled (close current file and create a new one) periodically based on the elapsed time or size of data or number of events.
a1.channels = c1
a1.sinks = k1
a1.sinks.k1.type = hdfs
a1.sinks.k1.channel = c1
#生成的文件夹名为年月日时分秒
a1.sinks.k1.hdfs.path = /flume/events/%y-%m-%d/%H%M/%S
a1.sinks.k1.hdfs.filePrefix = events- #导入文件的前缀
a1.sinks.k1.hdfs.round = true #是否按照时间生成一个新的文件夹,基于路径path去滚动生成文件夹的
a1.sinks.k1.hdfs.roundValue = 10 #这个时间的值是多少,此处是10也就没分钟生成一个文件夹
a1.sinks.k1.hdfs.roundUnit = minute #second,minute,hour。
##设置的文件类型,这种类型支持压缩,包括:SequenceFile, DataStream,CompressedStream
#使用DataStream时候,文件不会被压缩,不需要设置hdfs.codeC;
#当使用CompressedStream时候,必须设置一个正确的hdfs.codeC值;
a3.sinks.k1.hdfs.fileType = DataStream
#文件的格式
a3.sinks.k1.hdfs.writeFormat = Text
- Hive sink
此接收器将包含分隔文本或JSON数据的事件直接流到Hive表或分区中。事件是使用Hive事务编写的。只要将一组事件提交到Hive,它们就会立即对Hive查询可见。flume将流到的分区既可以预先创建,也可以选择在缺少分区时创建它们。来自传入事件数据的字段被映射到Hive表中的相应列。
a1.channels = c1
a1.channels.c1.type = memory
a1.sinks = k1
a1.sinks.k1.type = hive
a1.sinks.k1.channel = c1
a1.sinks.k1.hive.metastore = thrift://127.0.0.1:9083
a1.sinks.k1.hive.database = logsdb
a1.sinks.k1.hive.table = weblogs
a1.sinks.k1.hive.partition = asia,%{country},%y-%m-%d-%H-%M
a1.sinks.k1.useLocalTimeStamp = false
a1.sinks.k1.round = true
a1.sinks.k1.roundValue = 10
a1.sinks.k1.roundUnit = minute
a1.sinks.k1.serializer = DELIMITED
a1.sinks.k1.serializer.delimiter = "\t"
a1.sinks.k1.serializer.serdeSeparator = '\t'
a1.sinks.k1.serializer.fieldnames =id,,msg
- Avro sink
This sink forms one half of Flume’s tiered collection support. Flume events sent to this sink are turned into Avro events and sent to the configured hostname / port pair. The events are taken from the configured Channel in batches of the configured batch size.
a1.channels = c1
a1.sinks = k1
a1.sinks.k1.type = avro
a1.sinks.k1.channel = c1
a1.sinks.k1.hostname = 10.10.10.10
a1.sinks.k1.port = 4545
- kafaka sink
This is a Flume Sink implementation that can publish data to a Kafka topic. One of the objective is to integrate Flume with Kafka so that pull based processing systems can process the data coming through various Flume sources.
kafka.producer.acks 1 How many replicas must acknowledge a message before its considered successfully written. Accepted values are 0 (Never wait for acknowledgement), 1 (wait for leader only), -1 (wait for all replicas) Set this to -1 to avoid data loss in some cases of leader failure.
a1.sinks.k1.channel = c1
a1.sinks.k1.type = org.apache.flume.sink.kafka.KafkaSink
a1.sinks.k1.kafka.topic = mytopic
a1.sinks.k1.kafka.bootstrap.servers = localhost:9092
a1.sinks.k1.kafka.flumeBatchSize = 20
a1.sinks.k1.kafka.producer.acks = 1
a1.sinks.k1.kafka.producer.linger.ms = 1
a1.sinks.k1.kafka.producer.compression.type = snappy
channel
- Memory Channel
事件存储在内存中的队列中,其最大大小可配置。对于需要更高吞吐量并准备在代理失败时丢失分段数据的流来说,它非常理想
a1.channels = c1
a1.channels.c1.type = memory
a1.channels.c1.capacity = 10000
a1.channels.c1.transactionCapacity = 10000
#  Defines the percent of buffer between byteCapacity and the estimated total size of all events in the channel, to account for data in headers.
a1.channels.c1.byteCapacityBufferPercentage = 20
a1.channels.c1.byteCapacity = 800000
- File Channel
a3.channels.c1.type = file
a3.channels.c1.capacity = 10000
a3.channels.c1.byteCapacityBufferPercentage = 20
a3.channels.c1.transactionCapacity = 10000
a3.channels.c1.byteCapacity = 20000000